
I had recently written a couple of blog posts about building cloud native applications and microservices. Those blog posts were mostly high level overview posts, leaving out the low level implementation details. This blog post will be a first in a series of blog posts where I will talk about some of my favorite technologies for building cloud native applications and give examples of how to use them.
As you may have noticed by previous blog posts, I am a fan of Spring Boot and the simplicity it provides when building Java apps.
![]()
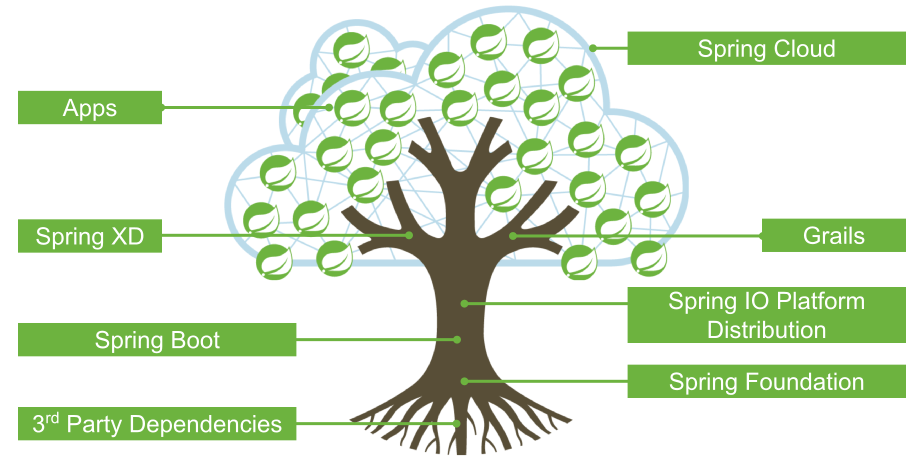
One of the Spring projects which builds upon Boot and that has been rapidly evolving over the past year plus is Spring Cloud. The overall goal of the Spring Cloud project is to allow you to build cloud native applications with Spring Boot. Here is a nice diagram (courtesy of some slides from Dave Syer and Spencer Gibb) which explains where Spring Cloud fits in the overall Spring architecture.
Some of the features included in Spring Cloud are
- Distributed/versioned configuration
- Service registration and discovery`
- Routing
- Service-to-service calls
- Load balancing
- Circuit Breakers
- Global locks
- Leadership election and cluster state
- Distributed messaging
As you might be able to tell by this feature list, many of these features have to do with building cloud native apps using microservices.
One of the more interesting projects under the Spring Cloud umbrella is Spring Cloud Netflix. Spring Cloud Netflix leverages a number of the Netflix OSS projects to provide some of the features listed above. There are a number of reasons why I find the Spring Cloud Netflix project useful. First off, Netflix has become the poster child of why microservices is a good way to build cloud applications. One of the reasons for this is because they have open sourced a lot of code they have written to run one of the biggest, most robust, microservices applications out there under the Netflix OSS umbrella. This means that the code from Netflix is proven to work in a real world use case, and I always like using code I know works. To make the Netflix projects easier to use, the Spring team has taken some of these projects and turned them into “starters” you can just include in your Spring Boot app, just like you would if you wanted to use JPA or AMQP. Some of the Spring Cloud Netflix projects are so simple to use that they just require you adding a couple of annotations to your Spring Boot app, the implementation is really nice and clean. Some of the Netflix OSS projects used in Spring Cloud Netflix include
- Eureka – for service discovery
- Hystrix – for all your circuit breaker needs
- Feign – allows you to define declarative REST clients
- Ribbon – client side load balancing
- Zuul – for routing and filtering
If you would like to learn more about Spring Cloud there are a number of good session recordings that you can listen to. Here is one from Josh Long and another from Spencer Gibb.
Getting started with Spring Cloud is relatively easy, especially if you are already familiar with Spring Boot. If you head over to start.spring.io you will be brought to a page that will basically bootstrap your Spring Boot app just by filling out a form. The Spring team has integrated the Spring Cloud projects into this tool, allowing you to use them in your Spring Boot app if you choose. In this blog post, and in a number of follow up posts, we will create a basic microservice app using Spring Boot and Spring Cloud. One of my interests outside of technology is obstacle course racing, so in the spirit of that interest, lets create a web app which lists some upcoming obstacle course races and participants in those races. There will be three “services” that make up the app, one producing the list of races, one which produces the participants in those races, and one that serves clients (browsers) the front-end code. Lets get started creating the three services.
Creating The Races Service
First, go to start.spring.io and fill out the form like the image below. The only check box you will need to check off is the one named “Web”.
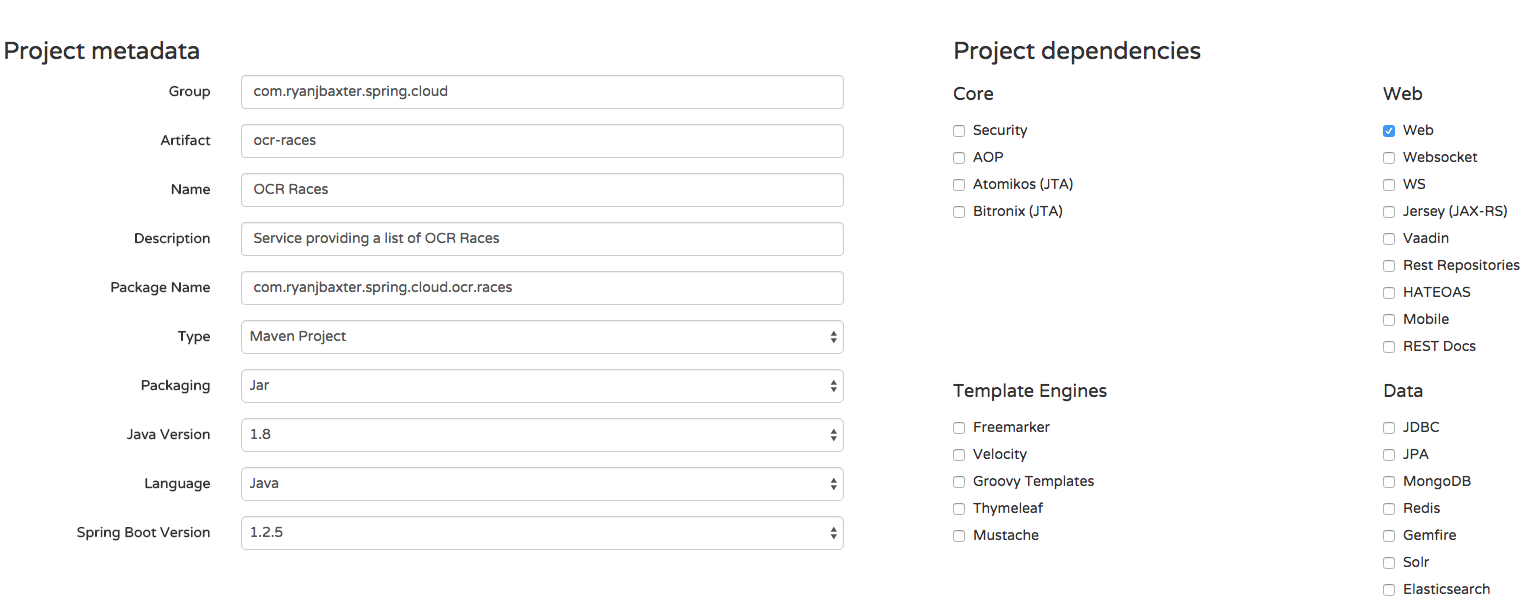
Then click the Generate button to download the zip file containing the source for your Spring Boot project. You can then import this project into your favorite IDE, I like to use STS, but you can use plain Eclipse or any other Java IDE as well as long as it supports Maven. There will be one source file in the package com.ryanjbaxter.spring.cloud.ocr.races called OcrRacesApplication.java. Open that up and copy the below code into it.
package com.ryanjbaxter.spring.cloud.ocr.races;

import java.util.ArrayList;
import java.util.List;

import org.springframework.boot.CommandLineRunner;
import org.springframework.boot.SpringApplication;
import org.springframework.boot.autoconfigure.SpringBootApplication;
import org.springframework.web.bind.annotation.RequestMapping;
import org.springframework.web.bind.annotation.RestController;

@SpringBootApplication
@RestController
public class OcrRacesApplication implements CommandLineRunner {

	private static List<Race> races = new ArrayList<Race>();

    public static void main(String[] args) {
        SpringApplication.run(OcrRacesApplication.class, args);
    }

	@Override
	public void run(String... arg0) throws Exception {
		races.add(new Race("Spartan Beast", "123", "MA", "Boston"));
		races.add(new Race("Tough Mudder RI", "456", "RI", "Providence"));
	}

	@RequestMapping("/")
	public List<Race> getRaces() {
		return races;
	}
}

class Race {
	private String name;
	private String id;
	private String state;
	private String city;

	public Race(String name, String id, String state, String city) {
		super();
		this.name = name;
		this.id = id;
		this.state = state;
		this.city = city;
	}
	public String getName() {
		return name;
	}
	public void setName(String name) {
		this.name = name;
	}
	public String getId() {
		return id;
	}
	public void setId(String id) {
		this.id = id;
	}
	public String getState() {
		return state;
	}
	public void setState(String state) {
		this.state = state;
	}
	public String getCity() {
		return city;
	}
	public void setCity(String city) {
		this.city = city;
	}
}
This code is pretty basic, it creates a single REST endpoint which returns all races. Right now races are just stored in a List in the class, this is just a basic sample, obviously there are more sophisticated ways of doing this  If you are using STS you can run this app easily by going to Run -> Run As -> Spring Boot Application. If you prefer you can also start the application via Maven from the command line at the root of the project by running
$ mvn spring-boot:run
The application will start on localhost using port 8080, so if you open your browser and go to http://localhost:8080/ you should see a JSON list returned with the race details.
We are going to have many services running at the same time on the same machine and they can’t all run on the same port, so lets customize the port the races service will run on. In the src/main/resources directory of the app there will be a file called application.properties. This is where you can set various properties of your Spring app. I prefer to use YAML files instead (less typing) so rename this file to application.yml. Then open the file and add the following two lines to it.
server:
  port: 8282
Now if you restart your app it should start on port 8282.
Creating The Participants Service
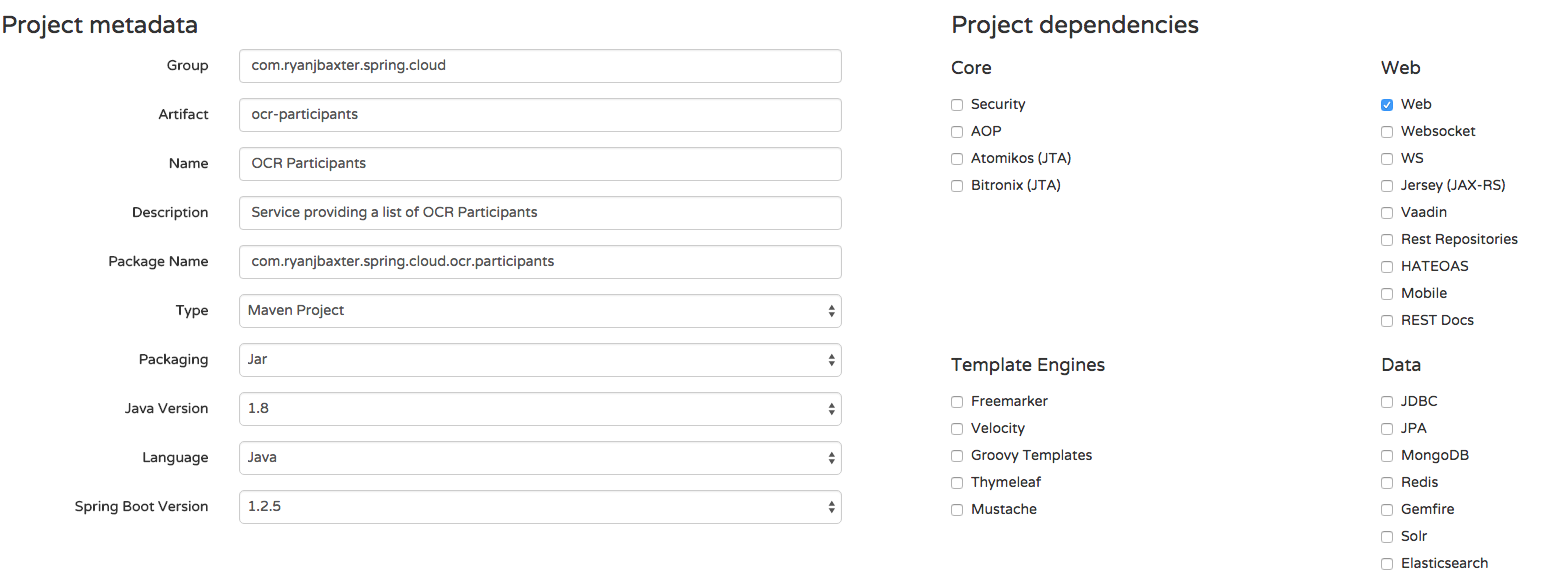
The next service we want to create is our race participants service. Again head back to start.spring.io and fill out the form like the image below.
Click the Generate button to download the code for your project and import it into your IDE. Again, there will be a single source file in the package com.ryanjbaxter.spring.cloud.ocr.participants called OcrParticipantsApplication.java. Open this file and copy the code below into it.
package com.ryanjbaxter.spring.cloud.ocr.participants;

import java.util.ArrayList;
import java.util.Arrays;
import java.util.List;
import java.util.stream.Collectors;

import org.springframework.boot.CommandLineRunner;
import org.springframework.boot.SpringApplication;
import org.springframework.boot.autoconfigure.SpringBootApplication;
import org.springframework.web.bind.annotation.PathVariable;
import org.springframework.web.bind.annotation.RequestMapping;
import org.springframework.web.bind.annotation.RestController;

@RestController
@SpringBootApplication
public class OcrParticipantsApplication implements CommandLineRunner {

	private static List<Participant> participants = new ArrayList<Participant>();

    public static void main(String[] args) {
        SpringApplication.run(OcrParticipantsApplication.class, args);
    }

	@Override
	public void run(String... arg0) throws Exception {
		participants.add(new Participant("Ryan", "Baxter", "MA", "S", Arrays.asList("123", "456")));
		participants.add(new Participant("Stephanie", "Baxter", "MA", "S", Arrays.asList("456")));
	}

	@RequestMapping("/")
	public List<Participant> getParticipants() {
		return participants;
	}

	@RequestMapping("/races/{id}")
	public List<Participant> getParticipants(@PathVariable String id) {
		return participants.stream().filter(p -> p.getRaces().contains(id)).collect(Collectors.toList());
	}
}

class Participant {
	private String firstName;
	private String lastName;
	private String homeState;
	private String shirtSize;
	private List<String> races;
	public Participant(String firstName, String lastName, String homeState,
			String shirtSize, List<String> races) {
		super();
		this.firstName = firstName;
		this.lastName = lastName;
		this.homeState = homeState;
		this.shirtSize = shirtSize;
		this.races = races;
	}
	public String getFirstName() {
		return firstName;
	}
	public void setFirstName(String firstName) {
		this.firstName = firstName;
	}
	public String getLastName() {
		return lastName;
	}
	public void setLastName(String lastName) {
		this.lastName = lastName;
	}
	public String getHomeState() {
		return homeState;
	}
	public void setHomeState(String homeState) {
		this.homeState = homeState;
	}
	public String getShirtSize() {
		return shirtSize;
	}
	public void setShirtSize(String shirtSize) {
		this.shirtSize = shirtSize;
	}
	public List<String> getRaces() {
		return races;
	}
	public void setRaces(List<String> races) {
		this.races = races;
	}

}
This class is similar to the same class in the races service, except here we are working with participants. Again we don’t want this app to start on port 8080 so in src/main/resources rename application.properties to application.yml and add these two lines.
server:
  port: 8181
If you start this application and go to http://localhost:8181/ you will see all participants. In addition if you go to http://localhost:8181/races/123 you will see just the participants who will be racing in the race with id 123.
Creating The Web Service
The final service we are going to create is a service which serves the client-side browser code. Our web app will be built using Angular.js. Again, we will create a new project from start.spring.io. Fill out the form following the screen shot below.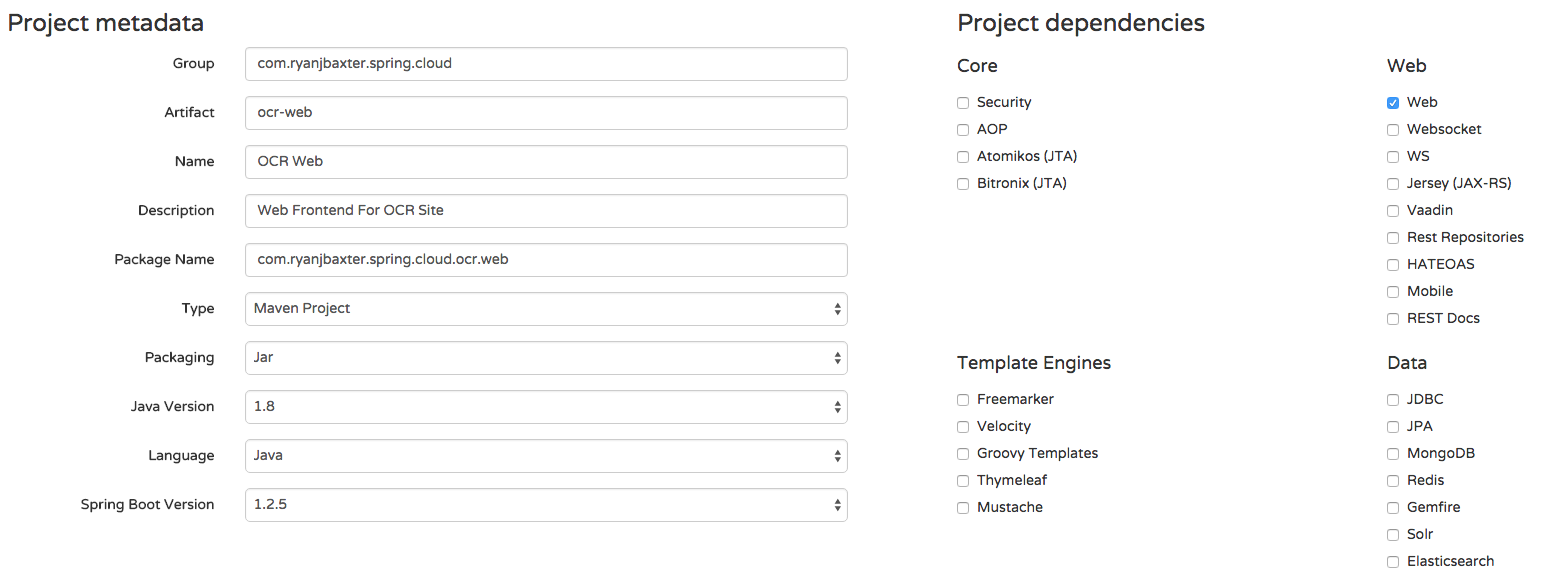
Open rename application.properties to application.yml and add the following two lines.
server:
  port: 8080
In src/main/resources/static create the directories scripts/controllers and views. In scripts/controllers create a new file called main.js and add the following code.
angular.module('ocrApp')
  .controller('MainCtrl', function ($scope, $http) {     });
In the scripts directory create a new file called app.js and add the following code.
angular
  .module('ocrApp', [
    'ngAnimate',
    'ngCookies',
    'ngResource',
    'ngRoute',
    'ngSanitize',
    'ngTouch'
  ])
  .config(function ($routeProvider) {
    $routeProvider
      .when('/', {
        templateUrl: 'views/main.html',
        controller: 'MainCtrl'
      })
      .otherwise({
        redirectTo: '/'
      });
  });
In the views directory create a file called main.html and add the following code.
<h1>hello world</h1>
In the static directory create a new file called index.html and add the following code.
<!DOCTYPE html>
<html lang="en">
  <head>
    <meta charset="utf-8">
    <meta http-equiv="X-UA-Compatible" content="IE=edge">
    <meta name="viewport" content="width=device-width, initial-scale=1">
    <!-- The above 3 meta tags *must* come first in the head; any other head content must come *after* these tags -->
    <meta name="description" content="">
    <meta name="author" content="">
    <link rel="icon" href="../../favicon.ico">

    <title>OCR Races</title>

    <!-- Bootstrap core CSS -->
    <!-- Latest compiled and minified CSS -->
	<link rel="stylesheet" href="https://maxcdn.bootstrapcdn.com/bootstrap/3.3.5/css/bootstrap.min.css">

    <!-- Custom styles for this template -->
    <link href="http://getbootstrap.com/examples/jumbotron-narrow/jumbotron-narrow.css" rel="stylesheet">

    <!-- Just for debugging purposes. Don't actually copy these 2 lines! -->
    <!--[if lt IE 9]><script src="../../assets/js/ie8-responsive-file-warning.js"></script><![endif]-->
    <script src="http://getbootstrap.com/assets/js/ie-emulation-modes-warning.js"></script>

    <!-- HTML5 shim and Respond.js for IE8 support of HTML5 elements and media queries -->
    <!--[if lt IE 9]>
      <script src="https://oss.maxcdn.com/html5shiv/3.7.2/html5shiv.min.js"></script>
      <script src="https://oss.maxcdn.com/respond/1.4.2/respond.min.js"></script>
    <![endif]-->
  </head>

  <body data-pinterest-extension-installed="cr1.38.4" class=" hasGoogleVoiceExt" ng-app="ocrApp">

    <div class="container">
      <div class="header clearfix">
        <nav>
        </nav>
        <h3 class="text-muted">OCR Races</h3>
      </div>

      <div ng-view=""></div>

      <footer class="footer">
        <p>© Company 2014</p>
      </footer>

    </div> <!-- /container -->


    <!-- IE10 viewport hack for Surface/desktop Windows 8 bug -->
    <script src="http://getbootstrap.com/assets/js/ie10-viewport-bug-workaround.js"></script>
    <script src="//ajax.googleapis.com/ajax/libs/jquery/1.11.3/jquery.min.js"></script>
    <script src="//cdnjs.cloudflare.com/ajax/libs/angular.js/1.4.5/angular.js"></script>
    <script src="//maxcdn.bootstrapcdn.com/bootstrap/3.3.5/js/bootstrap.min.js"></script>
    <script src="//cdnjs.cloudflare.com/ajax/libs/angular.js/1.4.5/angular-animate.js"></script>
    <script src="//cdnjs.cloudflare.com/ajax/libs/angular.js/1.4.5/angular-cookies.js"></script>
    <script src="//cdnjs.cloudflare.com/ajax/libs/angular.js/1.4.5/angular-resource.js"></script>
    <script src="//cdnjs.cloudflare.com/ajax/libs/angular.js/1.4.5/angular-route.js"></script>
    <script src="//cdnjs.cloudflare.com/ajax/libs/angular.js/1.4.5/angular-sanitize.js"></script>
    <script src="//cdnjs.cloudflare.com/ajax/libs/angular.js/1.4.5/angular-touch.js"></script>
    <script src="scripts/app.js"></script>
    <script src="scripts/controllers/main.js"></script>


</body></html>
If you start this application and go to http://localhost:8080 you will see a simple page that just says hello world.
Calling Our Races Service
Now it is time to try to leverage some of the services we created in our front-end. One of the first things we want to do is list all the races. In the web app service open main.js and add the following code.
angular.module('ocrApp')
  .controller('MainCtrl', function ($scope, $http) {
	  $http({
          method: 'GET',
          url: 'http://localhost:8282/races'
      }).then(function(response) {
    	  $scope.races = response.data;
      }, function(response) {
    	  console.error('Error requesting races');
      });
  });
Here all we are doing is calling our races service to get the list of races and assigning it to a variable in our scope. Start your races service app and the web app service and go to http://localhost:8080. If you open your browsers console you will see the following error.
Cross-Origin Request Blocked: The Same Origin Policy disallows reading the remote resource at http://localhost:8282/races. (Reason: CORS header ‘Access-Control-Allow-Origin’ missing).
If you are a web developer you are probably very familiar with this error. All modern browsers prevent AJAX requests to other domains unless the server on that domain has specifically allowed requests to come from your domain, this is called the same-origin policy. In this case we are making a request from localhost:8080 to localhost:8282 and the server at localhost:8282 has not said it allows requests coming from localhost:8080. We could enable CORS (cross-origin resource sharing) in our races service so we can make requests to it from localhost:8080, but this becomes quite messy. What happens when we deploy to production or test? Those are additional domains we have to enable as well. Since we can theoretically be talking to many, many microservices from the client side code we will have to do this for each service. In addition, it is not uncommon in a microservices application to have services evolve and change over time, so while the races service is located at a specific URL today, that might not be the case in the future. In short, hardcoding the URL to the service in our client side code and enabling CORS is just not going to cut it.
Luckily Spring Cloud has a very clean and robust solution available to us. To solve the problem of hard coding URLs in our client side code, or anywhere in our application, we will want to use service discovery. Service discovery allows services to query a central location for a complete list of services that are available and the URL(s) those services are available at. To solve the cross domain problem it would be nice if we had a simple reverse proxy on the same domain as our web app that leveraged the service discovery service to route requests to the right service. We can use two projects that are part of Spring Cloud Netflix to do just that. The Spring Cloud Netflix Eureka project will allow us to easily setup a service discovery service for our application while Spring Cloud Netflix Zuul sets up a reverse proxy that integrates with Eureka to call services. In the next blog post we will take a look at how to integrate these two Spring Cloud projects into our application to solve our cross domain problem.
