
After wrapping up part 5 of this tutorial, we had a fairly well rounded, yet simple, microservices application able to run locally on our machine. However, our ultimate goal is to not run the application locally but instead run it in the cloud, after all we are building a cloud native application. My cloud of choice is IBM Bluemix. However, the changes described in this post should work in any Cloud Foundry deployment, but I have only tested them on Bluemix. (Spring Cloud is not bias to any cloud platform, however the way you configure and deploy your Spring Cloud applications may depend on the cloud you are targeting.)
The first step in getting our application to the cloud is not going to involve writing code, instead we are going to look at setting up an environment for maintaining and deploying our app that will allow us to automate as much as possible. If our application is truley a cloud native application, than it should also be a 12-factor application. The first rule of being a 12-factor application is that our code should be in version control. Another property of a 12-factor application is that they have strictly separate build, release, and run stages. Luckily Bluemix provides DevOps services integrated into the platform which provides us with a Git repo for version control and build and deploy tools where we can setup a build and deploy pipeline to build, release, and run our application on Bluemix.
We have one critical choice to make at this point before we get down and dirty, do we want to put all of our services in one Git repo or have a separate Git repo for each service? When I first thought about what to do, I wanted to put everything in one Git repo just to simplify things. However, after heading down that path, I realized that it was the wrong decision and instead decided placing each service in its own Git repo was the right way to go. While initially this will require more setup time, it allows each service to evolve independently of each other in a true microservice and cloud native fashion. Take for example if we need to create a branch to work on a defect for one service, we don’t want a branch for all the other services as well, the only way to do this is if each service is in its own Git repo.
In this post we are going to walk through how to deploy our Eureka server to the cloud since it is somewhat different than the other services in our application. In the next post we will deploy the rest of the services.
Create A Git Repo For Our Eureka Server
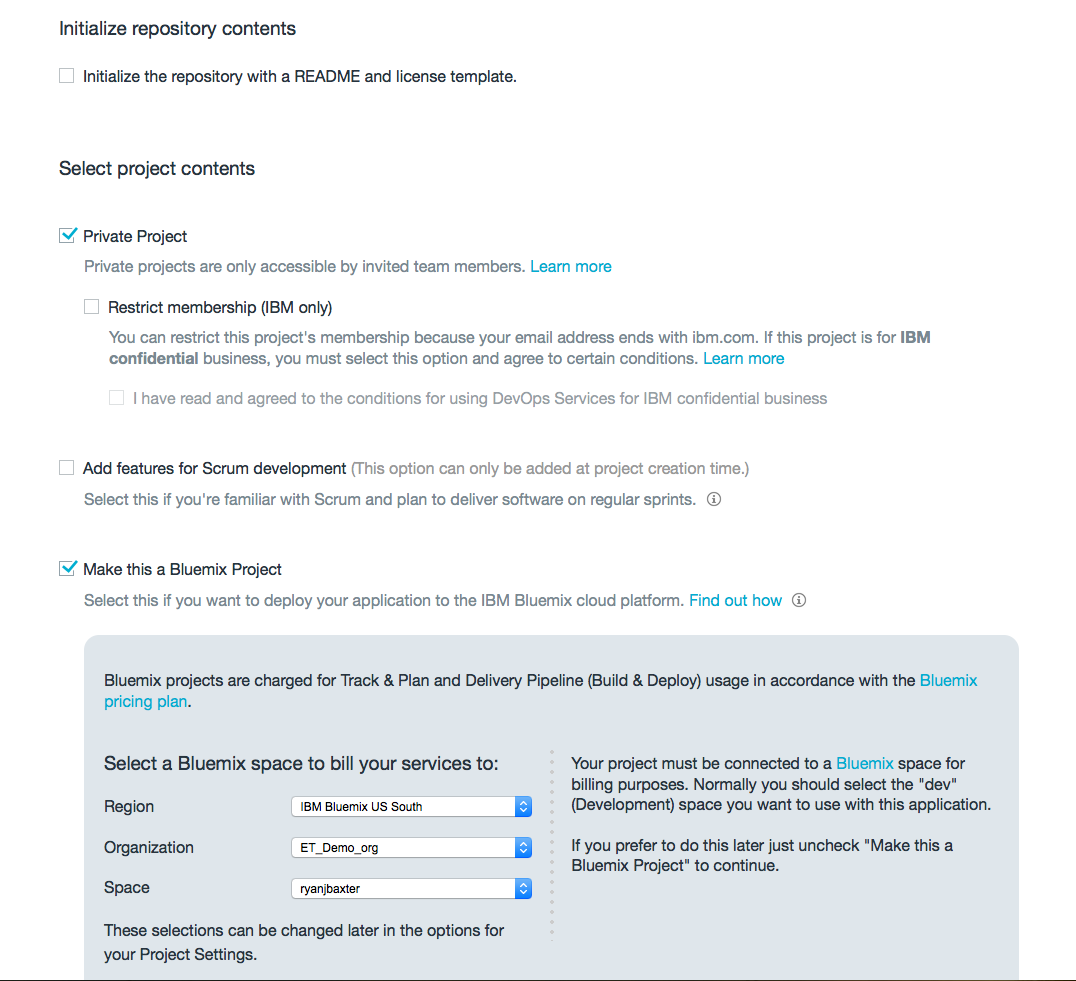
Lets get started by creating a new project in IBM DevOps services. Head to jazzhub.com, login, and click the Create Project button. Give your project the name ocr-eureka. Choose the option to Create a new repository, then select your location. I suggest you either create a Git repo on Bluemix or on GitHub. If you want to initialize the repository with a README and license file you can, I chose not to select that option. You can also choose to make the project private if you want, and add Scrum development features, however that is not really important for this exercise. You should check off Make this a Bluemix project and then select the Region, Organization, and Space you will want to deploy the application to. This step will be important later on when we setup our build and deploy pipeline. Below are screenshots of the configuration for my project.
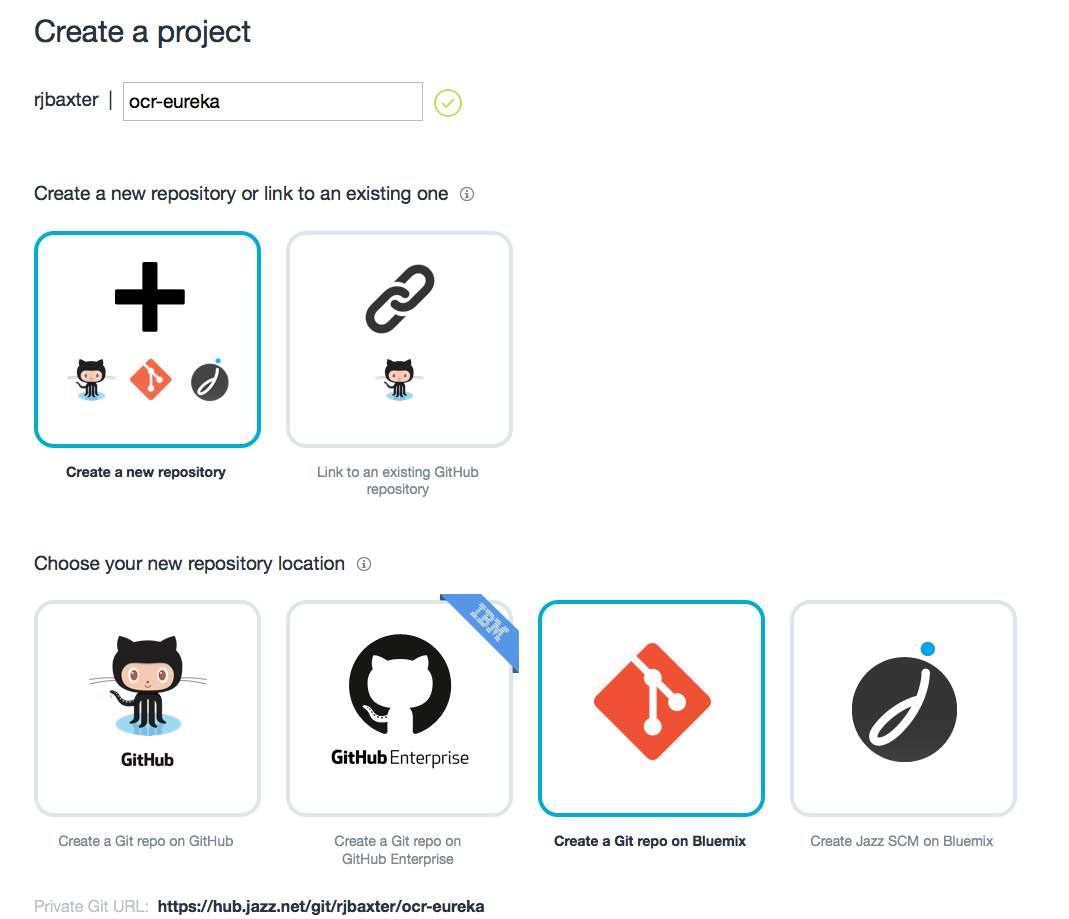
Finally click the Create button to create your new Git repo.
We now want to get our code into this new Git repo. Open a terminal window and navigate to the directory containing the ocr-eureka project. (You should navigate to the root of the project, the folder containing your POM file.) Before we do anything with Git we will want to create a .gitignore file so we don’t add files we don’t want in our repo. Using your favorite text editor create a file called .gitignore and add the following content to it.
.settings
target
.classpath
.project
Once you have saved that file run the following set of commands.
$ git init
$ git add .
$ git commit -m "initial commit"
$ git remote add origin <url to git repo on Bluemix>
$ git push origin master
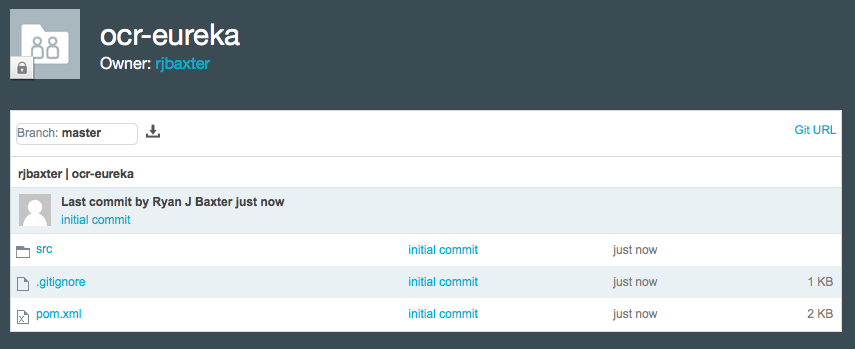
All we are doing above is initializing a local Git repo, adding all our code to it, committing it, adding our new remote Git repo, and than pushing all the code we committed locally to our remote Git repo in Bluemix. This should be nothing new to you if you are familiar with Git. Once the code has been committed to the remote Git repo in Bluemix, you can refresh the repository page in IBM DevOps Services and you should see all your code.
Configuring Eureka To Run In The Cloud
If you look at the application.yml file for our Eureka Server you will notice that the hostname is hardcoded to be localhost. Obviously we will need to change that when Eureka gets deployed to Bluemix. Luckily this should be a simple change, but how will we know the right URL to use?
There are a number of solutions to figuring out the right URL to use. One solution would be to set an environment variable to the URL for your Eureka server when you deploy the application to Bluemix and then use that environment variable in your application.yml file. However Bluemix (and Cloud Foundry) already provides us with an environment variable with the URL(s) of the application. The VCAP_APPLICATION environment variable, made available to the application by Bluemix (Cloud Foundry), has a uris property containing an array of all the URIs mapped to the application. So, instead of creating our own environment variable we can just use the value in VCAP_APPLICATION instead. Below is a sample of what the VCAP_APPLICATION environment variable looks like.
"VCAP_APPLICATION": {
  "application_name": "ocr-eureka",
  "application_uris": [
   "ocr-eureka.mybluemix.net"
  ],
  "application_version": "a20e5183-2627-48af-90bf-d11e4248a2f8",
  "limits": {
   "disk": 1024,
   "fds": 16384,
   "mem": 1024
  },
  "name": "ocr-eureka",
  "space_id": "10d307d3-8f7e-4d5c-8d95-6e3785e90738",
  "space_name": "ryanjbaxter",
  "uris": [
   "ocr-eureka.mybluemix.net"
  ],
  "users": null,
  "version": "a20e5183-2627-48af-90bf-d11e4248a2f8"
 }
}
Open your application.yml file for your Eureka server and copy the below YAML into your file.
server:
  port: 8761

eureka:
  instance:
    hostname: ${vcap.application.uris[0]:localhost}
  client:
    registerWithEureka: false
    fetchRegistry: false
    serviceUrl:
      defaultZone: http://${eureka.instance.hostname}:${server.port}/eureka/
Some of you might not be familiar with the syntax used in the hostname property. The ${value} syntax is a placeholder that lets us reference environment variables. Spring Boot does some magic when it is running in a Cloud Foundry environment to flatten out the JSON of the VCAP_APPLICATION environment variable so we can reference values via the dot (.) syntax in the placeholder name. The colon in-between vcap.application.uris[0] and localhost is kind of like an if else statement. It basically says if the environment variable VCAP_APPLICATION contains a uris property use the first item in that array as the hostname value, if not use localhost. By using this if-else syntax we can run our application locally or in the cloud without much effort (assuming you don’t have a VCAP_APPLICATION environment variable set in your local dev environment). You could use Spring Profiles to do the same thing, but this keeps our YAML file a little cleaner, so I like this syntax better.
Make sure you commit and push these changes to your remote Git repo in Bluemix.
Setting Up A Build And Deploy Pipeline For Eureka
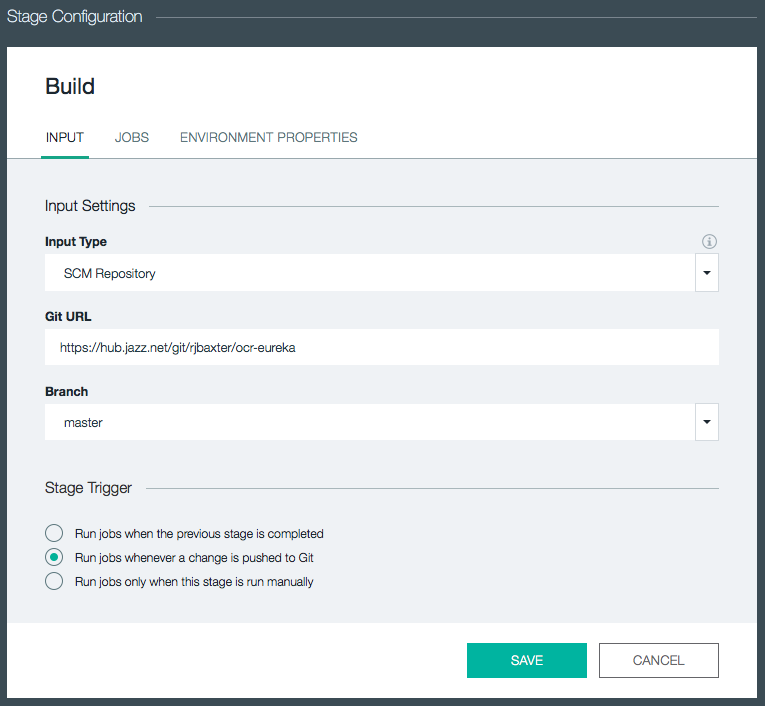
Now lets configure the build and deploy stages for our Eureka service on Bluemix. Back in the the project on IBM DevOps Services click the Build and Deploy button. Click the Add Stage button to add a new stage. Give the stage the name Build. For the Input Type, select SCM Repository, this should automatically populate the Git URL field. Make sure master is selected under the Branch drop down. In the Stage Trigger section select “Run jobs whenever a change is pushed to Git”.
Next click on the Jobs tab. Click the ADD JOB button and select Build. Under the Builder Type select Maven. The defaults for the build should be fine, we just need to make a small change to the shell script. Our code is using Java 1.8 but by default the build will use Java 1.7. To fix this problem change we need to change the JAVA_HOME environment variable to point to Java 1.8.
#!/bin/bash
export JAVA_HOME=~/java8
mvn -B package
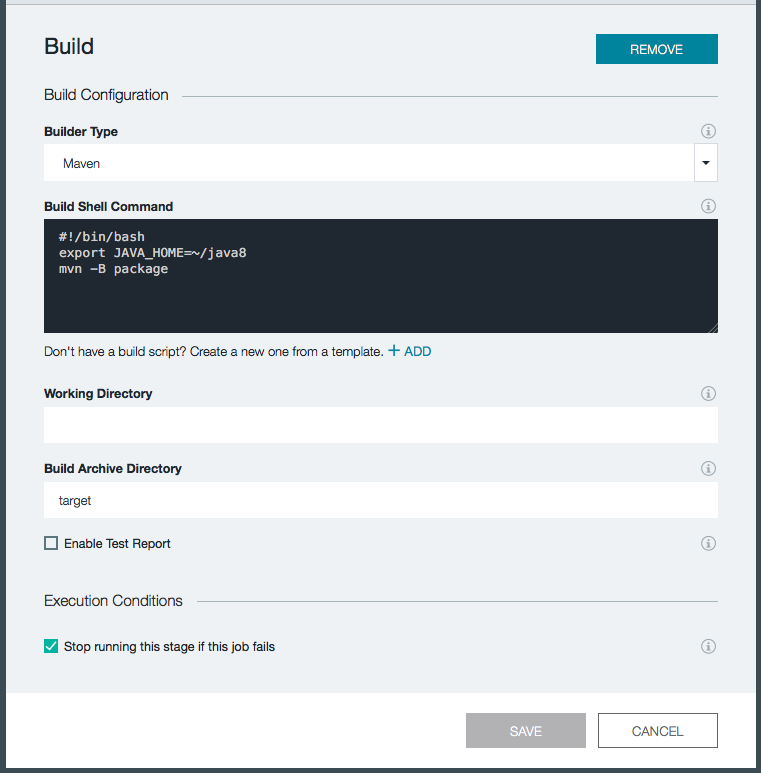
Click Save to save the Build stage.
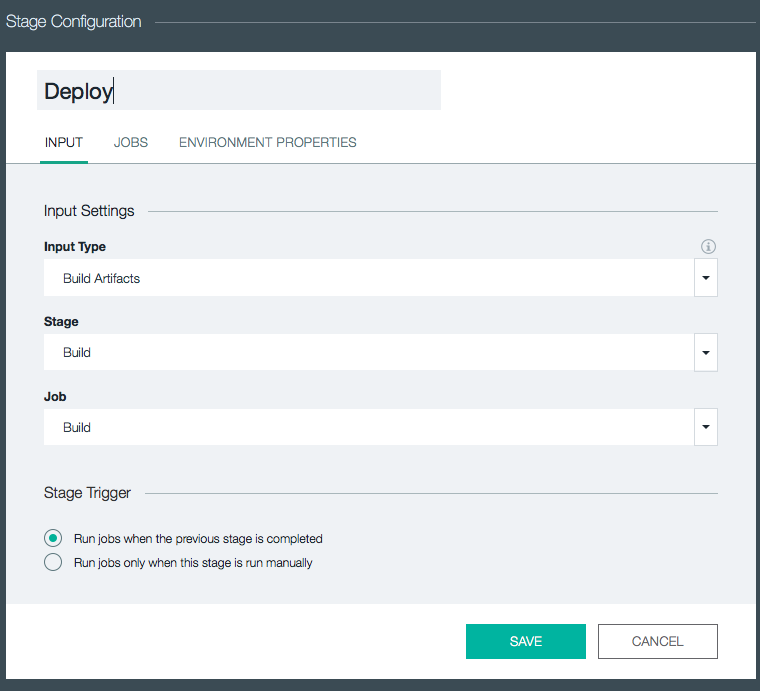
Back on the Build and Deploy page click the Add Stage button again to add another stage. Give the stage a name of Deploy. Under Input Type select Build Artifacts. By selecting Build Artifacts for the Input Type this stage will be provided with the build artifacts from another stage. In the Stage and Job drop downs select Build. Under stage trigger, select “Run jobs when the previous stage is completed” so that our deploy stage will run automatically after the Build stage finishes.
Next click the JOBS tab. Click ADD JOB and select Deploy. Under Deployer Type select Cloud Foundry. Under Target pick the datacenter you want to deploy to. Then select the Organization and Space you want to deploy the application to. We will need to modify the deploy script slightly to point at the Jar file we want to deploy. In addition to adding the Jar to deploy you probably will also want to configure the hostname for the Eureka server. If you don’t you can run into failures when you deploy the application if the hostname is already in use. Change the Deploy Script as follows.
#!/bin/bash
cf push "${CF_APP}" -p ocr-eureka-0.0.1-SNAPSHOT.jar -n ocr-eureka -m 512M
You will want to change the value of the -n option in your script to be a unique hostname of your choosing.
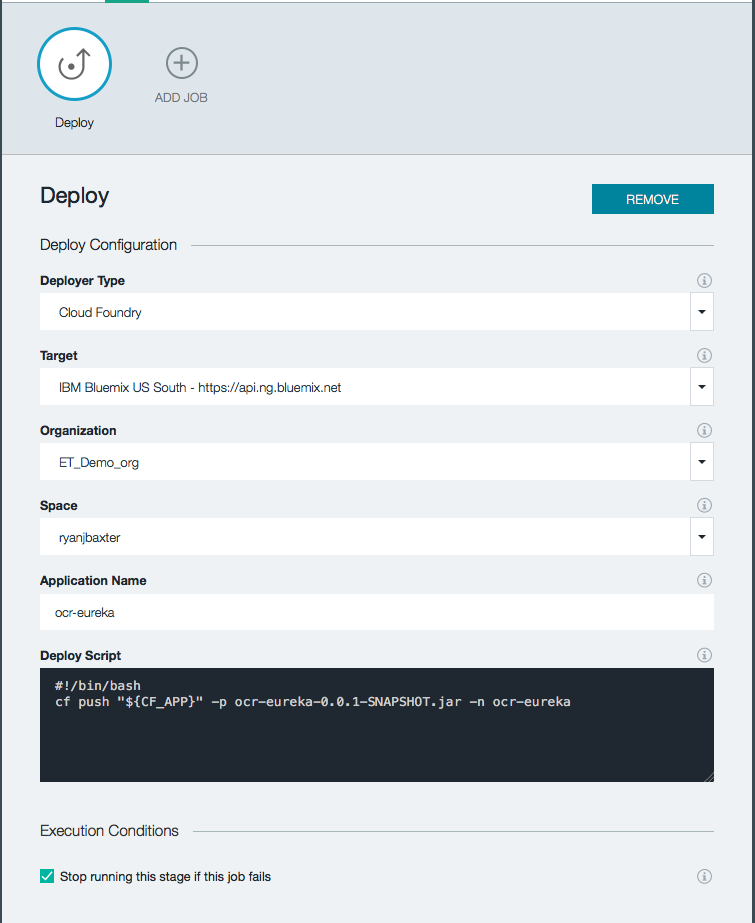
Click Save to return to the Build and Deploy screen.
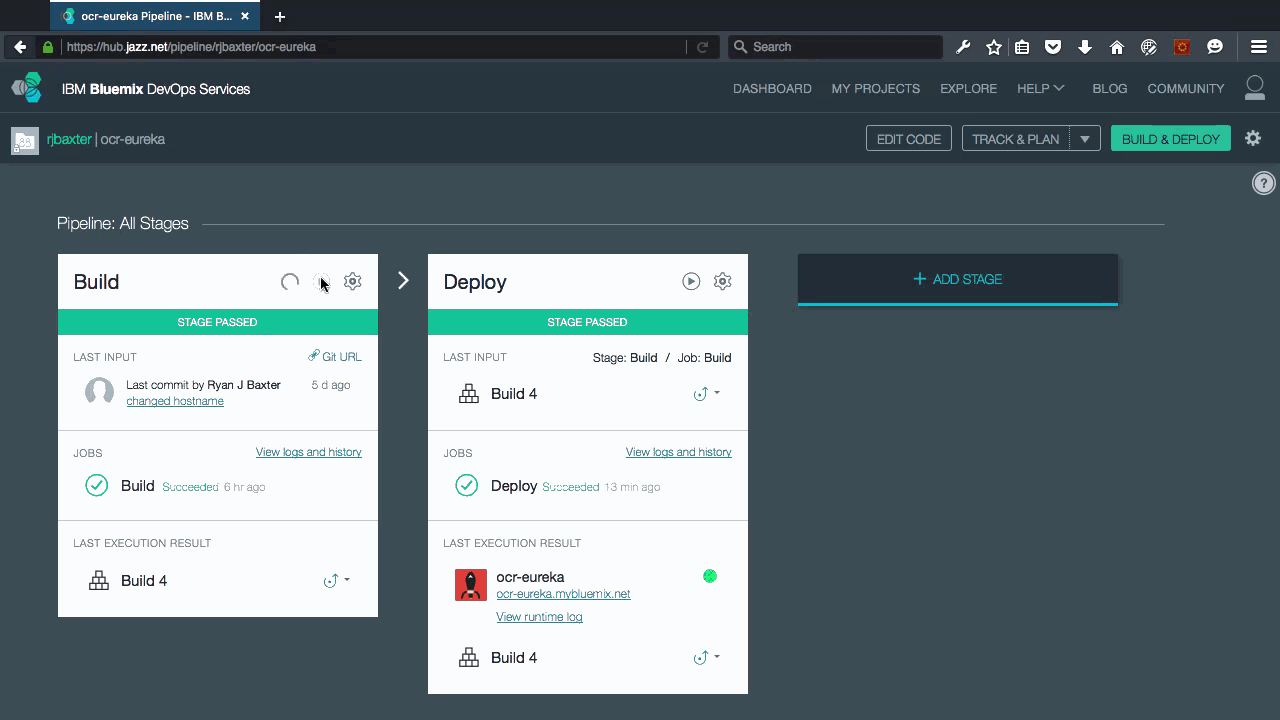
Now you can test everything out by clicking the play button on the Build stage. This will preform the build and then do the deployment to Bluemix. If you would like to watch the Build and Deploy stages you can click the View logs and history links to see realtime logs of what is happening during each stage. After the deployment finishes the Deploy stage will contain a link to the running Eureka server. Click it to make sure the app is running. You should see the familiar Eureka UI.
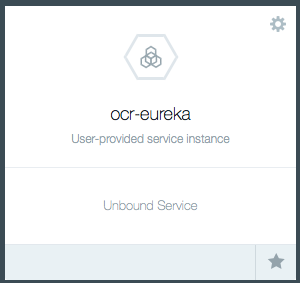
Eureka User Provided Service
Our other services (Races, Participants, Web, and Hystrix/Turbine) will all need to use Eureka. Up until this point we just hard coded the URL to the Eureka server in the application.yml files of these services, however in the cloud we want to do something a little more resilient. Bluemix (and Cloud Foundry) have a concept of services, somewhat different than a microservice, but along the same lines (the term service is overloaded these days). These are things like Databases, message queues, etc. Besides the services provided by the cloud platform, users can also create their own services for use in apps they deploy to the platform, these are called user-provided services. For our cloud deployment, we will create a user-provided service for our Eureka server that other apps (microservices) can then bind to. This gives us a nice abstraction layer between our Eureka server and the apps using that server. To create a user provided service we need to use the Cloud Foundry command line tool. Once you have the Cloud Foundry CLI installed, run the following command to authenticate with Bluemix and target the space and organization your Eureka server is deployed to.
$ cf login -a api.ng.bluemix.net
Then run the cf cups command to create a user-provided service called ocr-eureka.
$ cf cups ocr-eureka -p '{"uri": "http://ocr-eureka.mybluemix.net/eureka/"}'
Make sure you replace the hostname in the uri property in the command above with the correct URI to your Eureka server. IT IS VERY IMPORTANT THAT YOUR URI ENDs IN “/eureka/”. If you don’t construct the URI properly your microservices will fail to register themselves with Eureka.
You should now be able to see the service in your Bluemix dashboard or if you do $ cf services from the command line.
In the next step in the tutorial we will look at how we deploy the other services in our app to Bluemix.
