On-Premise Domino Data Access from XPages on Bluemix
Hybrid XPages appplication on Bluemix
XPages on Bluemix has been released as GA on May,2016, and developers can get the environment to develop XPages application easily on the cloud.
XPages code are compiled by “XPages runtime” for XPages on Bluemix. ![]()
This “XPages runtime” is just for runtime environment and should not store any data like Notes Document. Therefore XPages developer usually bind the service called “XPages No SQL Database” as the data store.
In fact, this “XPages No SQL Database” is just NSF file and you can store the data and create the view, form, etc.
However this “XPages No SQL Database” service is part of “Bluemix Labs Catalog” so far and according to IBM Japan, this service should not been used as the production environment.
By this blog post, I tried to use on-premise Domino as the data store for XPages on Bluemix.
Of cause it does not need to be on-premise domino, for example domino on SoftLayer is same meaning. This approach just try to access to outside of bluemix as the data store. It seams to be called as Hybrid XPages Application on bluemix.
BluemixのXPagesSet up the domino server to be used from runtime
![]() To run Hybrid XPages application, you need to configure your on-premise domino.
To run Hybrid XPages application, you need to configure your on-premise domino.
If you’ve already used “XPages No SQL Database” service, you maybe can ealiry imagine this, “/O=Bluemix” is used as Organization on bluemix. so xpages on bluemix cannot access to the on-premise domino without cross-certificate.
So as the first step, you need to create the new server id and then, when you deploy the application to the XPages runtime container of bluemix, you also attach the server id so that XPages on bluemix can communicate the on-premise servers through uploaded server id information.
Premise
- Installed Domino Designer, Administrator
- Installed Domino Designer 9.0.1FP6 or OpenNTF.org XPages Extension Library verson 15 or above
- Bluemix settings are configured by Domino Designer preference
- Already created XPages runtime application on Bluemix, and downloaded nsf and manifest file on your local
*Sorry, the screenshot are all in Japanese. I hope you still can understand where and what I explain.
Step 1: Create Server ID for Bluemix
- Launch Domino Administrator, then click “Configuration” tab
- From Tools pane, click “Registration” -> “Server”.
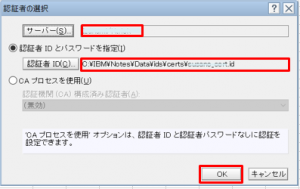
- In the dialog, specify cert id and click [OK]

- Enter password for Cert ID[OK]
- If you don’t need to change, then just Click Continue.
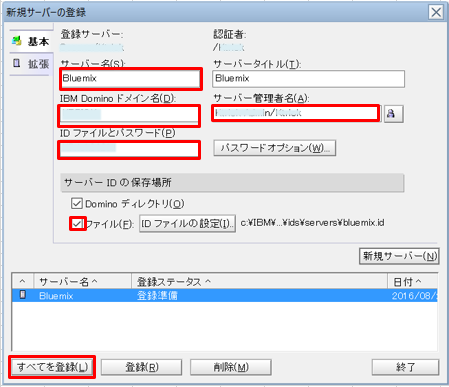
- Enter server information for bluemix. Click [Register All] to complete the process.
Server password is optional and usually you might not put password for server. but I added password since I give this server id to the bluemix. Also I recommend to output the server id as file by checking the checkbox.

OK, nothing special, just server id has been registered. the Different thing is you don’t need to install domino server by this server id since you only have to pass this server id to the bluemix Xpages runtime.
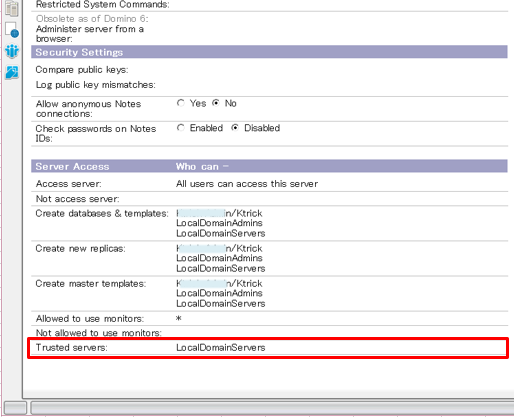
*Warning 1: Please confirm the server name is contained in “LocalDomainServers” group.
*Warning 2: Please confirm the server which has the access from Bluemix XPages runtime should contains the LocalDomainServers or created server name in Trusted servers field under the server document -> “Security” tab.
Step2: Configure IBM Bluemix Manifest
- Open Domino Designer and then open Xpages application NSF which is created from Bluemix and downloaded.
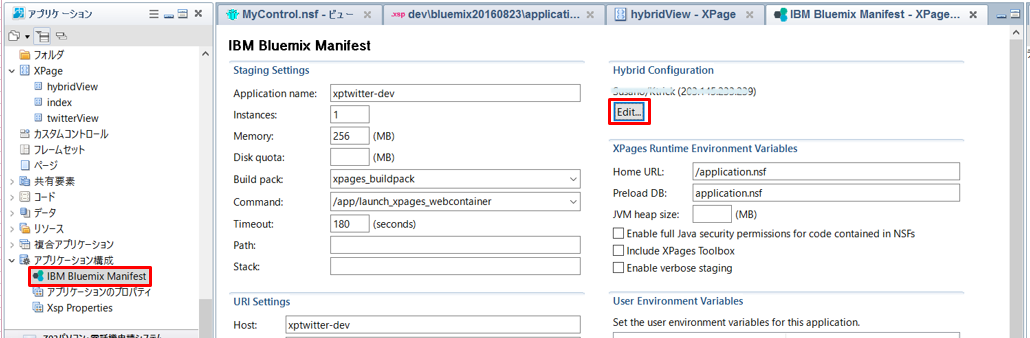
- Open “Application property” -> “IBM Bluemix Manifest”
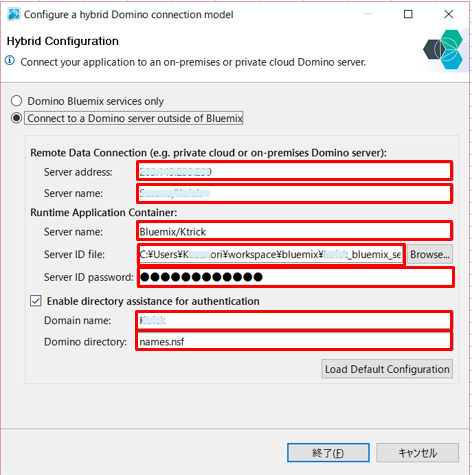
- On the right-top corner, Click Edit button in “Hybrid Configuration” section.
- Enter Hybrid configuration
- Remote Server Address ( APP_REMOTE_DATA_SERVER_ADDRESS)
: on-premise Domino IP addressのIP. - Remote Server Name (APP_REMOTE_DATA_SERVER_NAME)
: on-premise Domino server name(i.e. App01/ZetaDataBank)。 - Runtime Server Name (APP_RUNTIME_SERVER_NAME)
: Server name created above(i.e. bluemix/ZetaDataBank)。 - Runtime Server ID File (APP_RUNTIME_SERVER_IDFILE)
: Server id file created above - Runtime Server ID Password (APP_RUNTIME_SERVER_PASSWORD)
: Server id password if you specified. - Directory Assistance Enabled (APP_DA_ENABLED)
: Specify directory assistance enabled or not - Directory Assistance Domain (APP_DA_DOMAIN)
: domain name(i.e. ZetaDataBank)。 - Directory Assistance Address Book (APP_DA_ADDRESS_BOOK)
: Directory NSF which is necessary for authentication of hybrid environment (i.e. “names.nsf”)。
- Remote Server Address ( APP_REMOTE_DATA_SERVER_ADDRESS)
That’s all.
I created one sample xpage below:
<?xml version="1.0" encoding="UTF-8"?>
<xp:view xmlns:xp="http://www.ibm.com/xsp/core">
 <xp:this.data>
 <xp:dominoView var="view1"
 databaseName="App01/ZetaDataBank!!MyControl.nsf"
 viewName="AllContacts">
 </xp:dominoView>
 </xp:this.data>

 <xp:viewPanel value="#{view1}" id="viewPanel1">
 <xp:this.facets>
 <xp:pager partialRefresh="true" layout="Previous Group Next"
 xp:key="headerPager" id="pager1">
 </xp:pager>
 </xp:this.facets>
 <xp:viewColumn columnName="Id" id="viewColumn1">
 <xp:this.facets>
 <xp:viewColumnHeader value="Id" xp:key="header"
 id="viewColumnHeader1">
 </xp:viewColumnHeader>
 </xp:this.facets>
 </xp:viewColumn>
 <xp:viewColumn columnName="FirstName" id="viewColumn2">
 <xp:this.facets>
 <xp:viewColumnHeader value="First name" xp:key="header"
 id="viewColumnHeader2">
 </xp:viewColumnHeader>
 </xp:this.facets>
 </xp:viewColumn>
 <xp:viewColumn columnName="LastName" id="viewColumn3">
 <xp:this.facets>
 <xp:viewColumnHeader value="Last name" xp:key="header"
 id="viewColumnHeader3">
 </xp:viewColumnHeader>
 </xp:this.facets>
 </xp:viewColumn>
 <xp:viewColumn columnName="EMail" id="viewColumn4">
 <xp:this.facets>
 <xp:viewColumnHeader value="E mail" xp:key="header"
 id="viewColumnHeader4">
 </xp:viewColumnHeader>
 </xp:this.facets>
 </xp:viewColumn>
 <xp:viewColumn columnName="City" id="viewColumn5">
 <xp:this.facets>
 <xp:viewColumnHeader value="City" xp:key="header"
 id="viewColumnHeader5">
 </xp:viewColumnHeader>
 </xp:this.facets>
 </xp:viewColumn>
 <xp:viewColumn columnName="State" id="viewColumn6">
 <xp:this.facets>
 <xp:viewColumnHeader value="State" xp:key="header"
 id="viewColumnHeader6">
 </xp:viewColumnHeader>
 </xp:this.facets>
 </xp:viewColumn>
 <xp:viewColumn columnName="Created" id="viewColumn7">
 <xp:this.facets>
 <xp:viewColumnHeader value="Created" xp:key="header"
 id="viewColumnHeader7">
 </xp:viewColumnHeader>
 </xp:this.facets>
 </xp:viewColumn>
 <xp:viewColumn columnName="$10" id="viewColumn8">
 <xp:this.facets>
 <xp:viewColumnHeader value="Name" xp:key="header"
 id="viewColumnHeader8">
 </xp:viewColumnHeader>
 </xp:this.facets>
 </xp:viewColumn>
 </xp:viewPanel>
</xp:view>
I specified on-premise domino view in this sample. (Line 5)
Deploy to the bluemix through Domino designer.
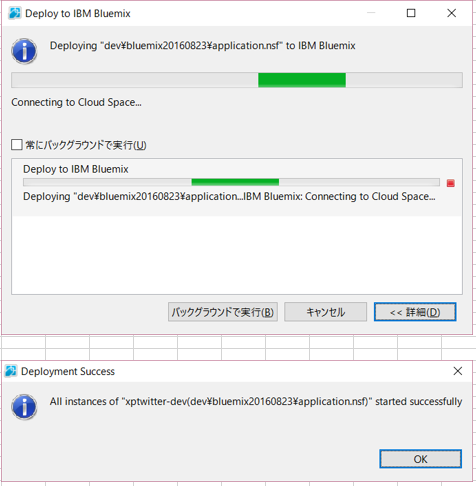
Bluemix service is going to reboot automatically. After wait for a while, access to the Xpage URL you created, and then if you get the on-premise data in the view, Success!