Working with standard Certificate Authorities in Domino 12
In the past weeks, I helped some colleagues with importing certificates in the Certificate Store of Domino 12 and while doing so, I noticed something peculiar. For many years, we haven’t had a proper way of creating certificates in Domino. The pre-12 database to create keys was completely outdated and didn’t allow for creating strong keys. As a result, most administrators got used to creating keys outside Domino, usually through on openssl command in Linux. This way of working found its way into procedures and many admins, instead of using the Certificate Store database, still follow these old procedures and create their keys outside Domino. I therefore decided to create a short article on how to create certificates with Domino 12 which are signed by a certificate authority which doesn’t support the ACME protocol.
Certificate request flow
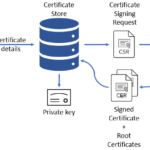
The workflow to get an officially signed certificate is fixed and the same for all certificates. See the flow diagram below. You create a private key and a certificate signing request. You send the certificate signing request to a certificate authority, which signs your certificate and sends it back. Then, you combine the signed certificate with the private key and intermediary/root certificates to complete a valid TLS certificate. The change with Domino 12 is that you create the private key and combine all certificates in the Certificate Store database.
Let’s look at these steps in detail.
Preparing the Certificate store
If this is going to be your first certificate that you create with the Certificate store, it’s always a good start to fill in the basics in the Global Settings (Edit Global Settings at the bottom left).
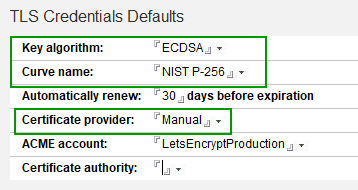 The relevant fields in the TLS Credentials are the Key algorithm and the Certificate provider. As I showed in a previous blog article, the ECDSA algorithm combined with NIST P-256 is as safe as RSA 4096 and far more efficient and therefore the preferred algorithm. Only if you need to support really old browsers (like IE7 and lower), you need RSA 4096. Choose ‘Manual’ for the certificate provider if you’re going to have your certificates signed by a certificate authority that doesn’t support the ACME protocol.
Also enter the Certificate Attribute Defaults. This info will be the default for any certificate created in this store.
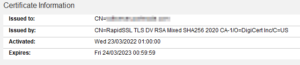
Second, import the root certificate of your certificate authority. You can do this later, but you need to do it before you import a certificate that was signed by your authority, so now is as good a time as any. Say for example that you use RapidSSL as your certificate authority. The RapidSSL certificate is signed by Digicert, so you need to import the Digicert global root ca certificate as a .pem file. In the certificate store, under configurations, click ‘Trusted Roots’ and the ‘Add Trusted Root’ button. Open your .pem-file, copy the content and click ‘Paste Certificate’ from the top bar. Then click ‘Submit’. If all went well, after some time (you might need to press refresh), you’ll see the root certificate in the list.

Creating a private key and csr in the Certificate Store
Now is the time to create your private key and certificate signing request. Go to TLS Credentials – By Host Name and click on ‘Add TLS Credentials’.
Here you have to make an important choice. Do you need this certificate anywhere else than in Domino? For example, if it’s a wildcard certificate, it’s likely that you will need it at other places as well. In that case click on ‘Create Exportable Key’ and enter a password. Keep this password secure. You need it if you want to use the private key outside Domino.
Next, enter the common name for your certificate in both the Host names field and in the Common Name (CN) field. Finally, select the Domino server(s) that will host the website and press ‘Submit Request’
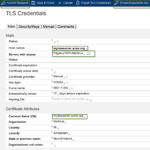
The server will process the request and create a Certificate Signing Request. If the CSR is ready, the certificate will have the status “Waiting”. Open the request and press the ‘Copy CSR’ button. Paste it in an empty text file and save it, for example, as mynewserver_acme_org.csr.
Signing your certificate
This file should be submitted to your certificate authority. Many of these authorities have a web portal to submit a signing request. When you request is signed, you can download the certificate. If you need to choose a type for the certificate, choose for a base64 encoded .pem-file. Next to the server certificate, you also need the intermediary certificate. In case of RapidSSL, you for example need the RapidSSL intermediary, which you can download from the same interface where you download the server certificate.
Importing the certificate in the Certificate Store
Once you have the certificates, there’s one step left. Pasting them in the certificate in the Certificate Store.
Open your certificate document in the certificate store. Also open the certificates you got back from the CA in a text editor. Copy the certificates to the clipboard and use the ‘Paste Certificate’ button. Alternatively, you can go to the manual tab and paste them in the ‘Paste – Certificates and Roots (PEM)’ field. Remember to import both certificates (server and intermediary). When done, press submit. No need to fill in anything else.
After a moment, your certificate should appear green in the Certificate store and you’re done.
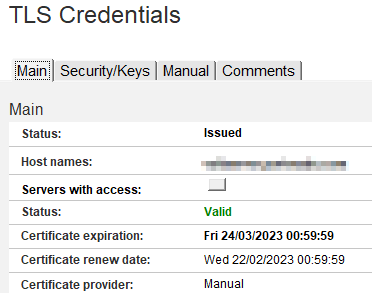
Security/Keys