
Continuing the extension of my TOTP session from Collabpshere, I wanted to expand upon modifying the Login Form and MFA page for those who need it and want to know how to do it.
The truth is I covered this in my 2021 Collabsphere presentation but since learned a few things which I want to pass on to all of you.
In 2021, I created this flowchart explaining how to add your corporate logo to the background logo.
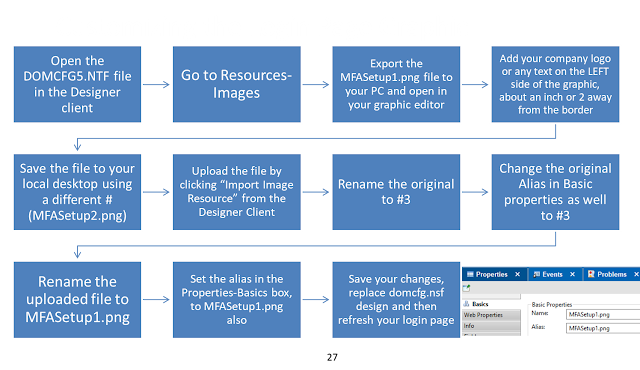 |
| How to add your company logo to the TOTP Backgroud graphic. Of course, you could use any graphic, just figure out the scaling side, but I found it easier to just add my logo to the existing MFASetup1.png file. There is a style.css file (Under Resources-Style Sheets) where if you find this section, you can change the graphic to whatever you want by renaming the png file and, of course, adding your graphic to the Resources-Images section: 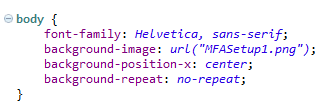 So how do we let people know it is the company's MFA login page? I edited the form called $$LoginUserFormMFA in the domcfg5.ntf. If you don't do it in the ntf, you will lose your updates when the design task runs. I replaced the HCL Domino text with the company name and added MFA Login Page. While editing the text, I added the details below, which is helpful since the default page tells the user nothing. |
MFA Instructions / Help
To set up and start using MFA take the following steps:
Step 1: Enter your Username and Password and press the 'Login' button.
Step 2: Follow the prompts to set up Multiple Factor Authentication, our preferred authenticator app is Duo.
Step 3: Once you have set up the MFA, return to the login page. Enter in your username, password, and MFA Token via your authenticator
Step 4: Click the Login button.
Naturally, you can add whatever text you wish and probably add a popup help window, among other things, but I am just a simple admin.
Don't forget to save your changes.
While still in this form, if you go to the list of objects below the window and look for the "Window Title" object, you can edit the text there, as I have, so it says "The CompanyName MFA Login Page." And don't forget to save your changes.
I like to minimize helpdesk calls, so I want people to realize it is a legitimate site. I know, hokey, but something is better than nothing.
The hard part, and I don't suggest you do this unless you really want to do it, is to edit the MFA Setup page.
You see, it is not a page, or a form, or a view. It is a small java file.
You would have to unarc/zip it or whatever you do to java files, edit it, recompile it, and put it back on your server.
And if you do a server update, it will wipe it out.
And you would have to do it all over again. You might be able to copy the file, but if HCL makes any changes, you are screwed, so I have decided not to mess with it.
The .ntf would also get overwritten on an update, so why do it there?
To me, it is easier to replicate and maintain a local copy of the .ntf than to do it for the java part, but again, YMMV.
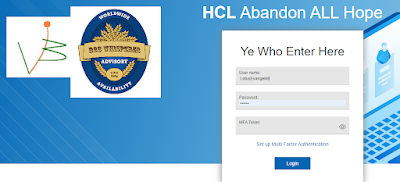
My personal server page looks like this now:
If you previously had a custom login form and now want to add TOTP, I strongly suggest you copy your custom form into the $$LoginUserFormMFA and sort it out from there.
There are too many parts to TOTP and the domcfg database that will make it hard to do it in reverse,
I am sure my developer friends may make fun of me, but this was the easier(less time involved) of the 2 ways we tried to do it to bring it up and make it work. Again YMMV.
I did not touch on the use of the notes redirector, but that is how we are using it, and of course, if you need to edit the iNotes Redirector, I wrote a few posts about it many years ago, you can click on that section from the top of my blog or use this link: https://blog.vanessabrooks.com/p/inotes-redirector.html.
No comments:
Post a Comment