
Building your Domino Container Image in 2024
When you have a child which you see everyday, you don’t really notice how much he/she grew until you compare their current height with the line on the doorpost of the year before. It’s like that with the Domino container community project for me. My last major post on the Domino container project was in July 2022. Daniel Nashed, the main contributor to this project, has been steadily working on and there are many additions to the project. I use Domino containers on a daily basis, so I’ve seen the progress step by step. Only when reading my post from 2022, I realised how far the project has progressed in the past 21 months. Time for an update! The project also got a new status as since Domino 12.0.2, HCL’s official container images, which you can download from FlexNet, are now also based on the community container scripts!
There are 2 new additions which make creating a Domino container image much easier:
- The use of the domdownload script
- The build menu
Next to that there are a couple of very interesting new options. In this article, I’ll mainly focus on these two items. In another article, I’ll focus on the new options.
The domdownload script
Domino 14 includes the new AutoUpdate feature. This feature automatically downloads new versions of Domino and its add-ons when they are available. Accompanying this new functionality, HCL launched a new download portal with an API. Daniel Nashed created a script to use this API to download Domino and its add-ons from the command line and added this functionality to the Domino container image build scripts. Even though the domdownload script in itself is not specific to the Domino container project, it’s a great addition as you no longer have to worry of where to put your software packages and if all packages are up to date when building a new container image. The script will simply take care of this itself.
Of course you need to install the script first. It’s part of Daniel’s Domino start-script repository. This repository contains another script though which is even more useful when you want to build a Domino image: install_container_env.sh. This script not only installs the domdownload script for you, but also installs a container engine, clones the domino-container scripts and prepares your machine for not only building Domino images, but also running Domino as a container.
To make it really easy for yourself, you can simply download and install this script in one go:
curl -fsSL https://github.com/nashcom/domino-startscript/raw/main/install_container_env.sh | shToken
When this script installs all software, it will ask you to enter a download token. You need this for the domdownload script. The script mentions how to get this download token:
Please visit -> https://my.hcltechsw.com

- Log in with your HCL software account.
- Navigate to the upper right corner and select 'API keys' to generate a key.
- Specify the generated key as a download token below.
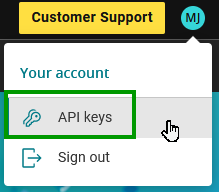
It’s worth mentioning that with “the upper right corner”, Daniel means your initials which appear there once you’re logged into the portal.
When the script is done, you will find a /local/github directory that contains both the domino-startscript folder as the domino-container folder. The next step is, as the script mentions at the end, to move into the /local/github/domino-container directory and start the build script:
cd /local/github/domino-container
./build.sh
The Build Menu
If you used the previous commands, you see the new build menu.
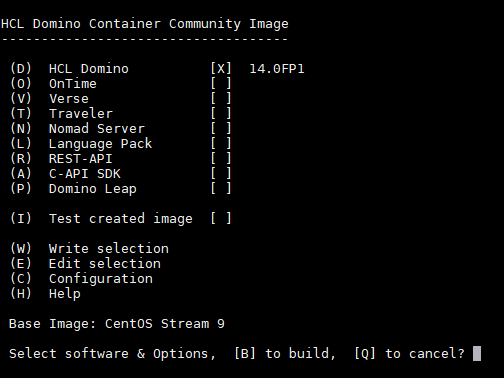
By simply using the letters in front of the add-ons, you can add the add-ons you want, so o,v,t,n,r,a will give you an image with the latest version of Domino with the latest versions of OnTime, Verse, Traveler, Nomad Server, the REST-API and C_API SDK installed. Note that you can write the selection with ‘W’. If you do this, your current selection will be auto-selected next time you open the build menu. When you type ‘B’ the script will do the rest for you, which means downloading any software that it’s can’t find in the download location (by default /local/software), downloading the base image (by default CentOS 9 Stream) and installing Domino and all the chosen add-ons on top.
Test created image
The option “Test created image” deserves a special mention. If selected, this option will spin up a temporary Domino container after the build process and test whether Domino and the selected add-ons are working as expected. When everything was tested successful, you will see something like this and in script, the build command would return a 0. You can test on that and only perform the next action (like upgrading your servers) if the image was tested successfully.
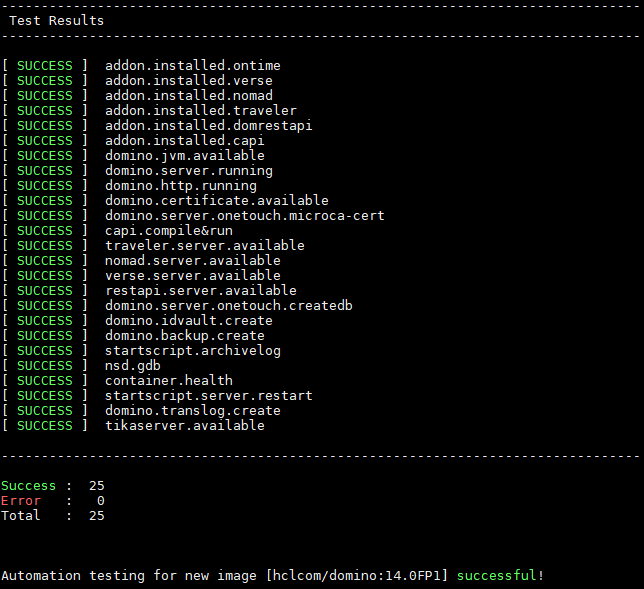
On my machine, this creates a Domino image with all add-ons and auto-tested in about 9 minutes. This includes automatically downloading all the software. Pretty cool!
Conclusion
By writing new scripts like the domdownload and install_container_env script and adding a menu to the build script, it’s easier than ever to create a Domino image. Even if you’re a Linux newbie, it’s task which runs down to just a couple of command lines which you can simply copy from this blog post. Running a server with a Domino image is as easy as it always was, but more about that in a next article.
It’s good to note that the script is backwards compatible, so everything that worked before, still works.
